- The Herb Guide Home
- Growers Dictionary
- Growing Seed
Growing Seed
As an Amazon Associate I earn from qualifying purchases

Growing seed is the cheapest method of getting herb plants - or indeed, plants of any type.
Annuals - such as basil - are always sown from seed or bought as a growing plant from seed sown that year.

You can try a sample lesson to help you decide if the Herbal Academy of New England is the right choice for you - follow the link below.
You can sow biennials - eg parsley seed - and perennials - eg thyme.
There are drawbacks to growing seed - often, there will be hundreds of seeds in a packet and you will get so many plants from it, that you won't have enough room for the pots when they're transplanted – pots over every available surface in the house and a nightmare keeping them all watered:-)
You could either decide to sell the surplus – see Growing Herbs for Profit – and organise yourself for that - or just sow a few seeds from the packet. Reseal the packet and put the seeds in a poly box in the fridge – there is a ‘best before date’ on the packet and most will germinate after that time.
I grow basil like this – a pinch of seed into a pot every month or so gives me a constant supply of basil plants and I keep the seed packet in the fridge.
The best time to sow seed will be on the packet – they assume you will be sowing for the plants to go outside – you can sow seed for growing herbs indoors any time of year.
Growing seed indoors
This is probably the most reliable method of starting seeds.
You will need:-
- seeds
- Potting compost
- Seed tray or plant pot
- Colander, sieve or similar shaker
- Plant water spray
- Poly bag or sheet of Perspex/glass
Fill the tray or pot with compost and give it a shake and tap so that the soil settles. Then ‘firm’ the soil by lightly pressing a board on it.
Dampen the soil and leave it for a day – the soil should be moist, not wet when you sow the seeds – this waiting time also allows the soil to warm in the atmosphere a little – this will help the seeds to germinate quickly.
Scatter the seed as thinly as you can and then cover the seed with fine compost – sieve it if you can – then firm again.
If the seeds are larger, then place them evenly across the compost - the packet will give you an idea of how far apart to plant them.
Either cover the tray with a poly bag or pane of glass/Perspex and leave it in a warm, shady place – seedlings don’t like bright sun.
Check every day and when the seeds begin to come through, remove the cover – still shield from direct sun, but give the pot more light.
You can move the tray to a windowsill that doesn't get direct sun - turn the tray daily so that they don't all grow towards the light :-)
Using a plant spray, you can gently moisten the compost in the tray whilst the seedlings are growing – this won’t disturb the soil and the delicate roots.
The first leaves you see are called ‘seedling leaves’ and they are closely followed by another set of leaves – ‘true leaves’
When the first ‘true leaves’ come through, your seedlings are ready for transplanting.
An alternative method of growing seed
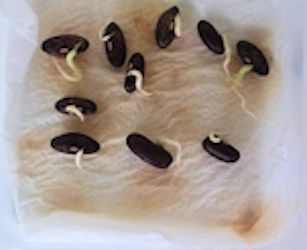
You can germinate your seeds on damp paper – this will speed up the process a little and you'll actually *see* how the seeds are germinating. This is perfect for old seeds, to see if they are viable and also useful for hard coated seeds.
Just dampen some blotting paper or kitchen roll and scatter the seeds on it. Cover with another sheet of paper and keep in the warm and shade and mist the seeds daily – a plant spray set on fine is great for this.
As soon as the shoots appear, they are ready to pop into damp compost.
Instructions for ‘growing on’ are here:- Growing From Seed - Part 2
These pages will also be of interest to you.
I may receive a commission if you purchase something mentioned in this post. See more details here This will not affect the amount you pay.


